

Sarah Pappas
Madison Early Childhood Center
Elmhurst, IL
2022
The Pasta Project took place at the Madison Early Childhood Center, which serves students ages 3–5 through morning and afternoon sessions. Program funding is provided by the local school district, statewide Preschool for All, and tuition. Of the 31 students who participated in the Pasta Project, 10 had Individualized Education Programs (IEPs), and six were dual language learners.
All staff at the center have been implementing the Project Approach for the past two years after receiving extensive schoolwide training, and all the students participating in this project had prior experience with the Project Approach. This school year, we set a schoolwide goal for each classroom to complete two projects. The Pasta Project was our second project and lasted eight weeks in the spring. Teachers involved were Sarah Pappas, Colleen Hohman, Nicole Wolf-Molinari, and Doreen Comings, our speech and language pathologist (SLP).
Phase 1: Beginning the Project
In our early childhood center, we have four different professional learning communities (PLCs) that meet weekly and set a goal as a group in the beginning of the year. The PLC that I am a part of set a goal to support each other through the three phases of the Project Approach. In the spring, the PLC members decided to start on projects at similar times and, if student interest supported it, to choose a topic under the theme of food. We were hoping that having topics under a similar category and around the same time would allow us to thoughtfully and purposefully collaborate, coteach, and set up field work opportunities within the school to support student learning.
During center time, I spent extra time in our dramatic play area to listen to student conversations and try to find similar areas of interest about food among multiple students. One day, the students in dramatic play were very excited as they talked about putting a meatball on top of their spaghetti. Later that day at circle time, I asked the students if they liked meatballs, and several excitedly said yes. They agreed to make a quick web about meatballs, and I learned that they knew some basic information about meatballs, such as the shape and color. However, I could tell from that web that the topic might be too narrow for a project.
The next day, the students continued to talk about meatballs and spaghetti in dramatic play. We encouraged them to make meatballs out of brown paper and tape at the art center, and they then brought them to dramatic play. Afterward, at circle time, I asked the students, “Who likes to eat pasta?” The students were very excited to express their interest in pasta. I grabbed a piece of chart paper, and we made another web about pasta (see Figure 1).

The students were very excited to share their knowledge about pasta. They talked about types of pasta such as bow tie, spaghetti, ziti, and ramen. They talked about toppings, how pasta is cooked, and where it comes from (e.g., stores and restaurants). I could tell from the web that this had the potential to be a great project.
All my students have prior experience with projects and know that when we create topic webs, we also write down any questions that come up as we are talking and sharing our ideas. I placed another chart paper with a large question mark in the middle right next to the web. We call this our Question Catcher. I used this form to begin adding their questions about pasta (see Figure 2).
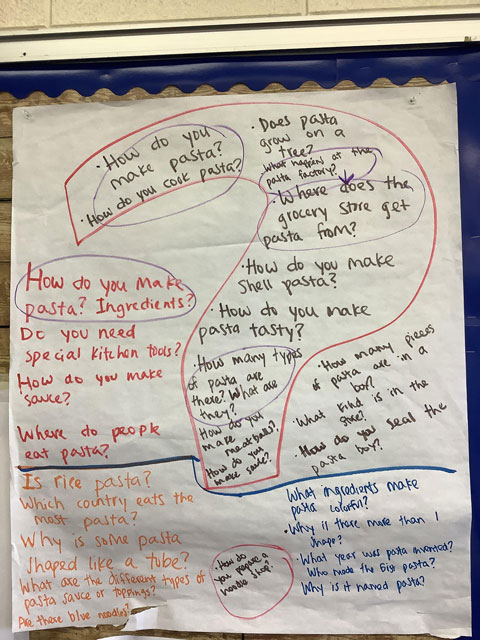
The students raised their hands to add more thoughtful, awesome questions, and I experienced that moment as a teacher where I knew the topic was chosen and we were ready to learn all about pasta. Because the students asked so many questions and I added all their ideas to Question Catcher, I found it helpful to organize the questions and create a second list of focus questions to guide us when beginning Phase 2. The focus questions I selected were:
- How do you make pasta? What are the ingredients?
- How many types of pasta are there? What are they?
- How does the pasta get to the grocery store?
- How do you make pasta sauce?
- How many pieces are in one box of pasta?
My expectation for this project connected back to the goals of my PLC. For example, I wanted to share the work with my PLC as my students moved through the three phases, and I wanted to be thoughtful and intentional about the learning sequence. I also wanted my students to have the opportunity to display their work and learning throughout the school. Lastly, I wanted to encourage parent involvement and get some great experts on pasta lined up.
Phase 2: Developing the Project
Once the topic was established, there was an excitement in the room that I haven’t felt in a long time. The students walked into the room every day talking about pasta! They continuously asked me to add more of their questions to the Question Catcher. For example, upon arrival one day, a student said to me, “Ms. Sarah, I have two more questions that we need to add to the Question Catcher today!”
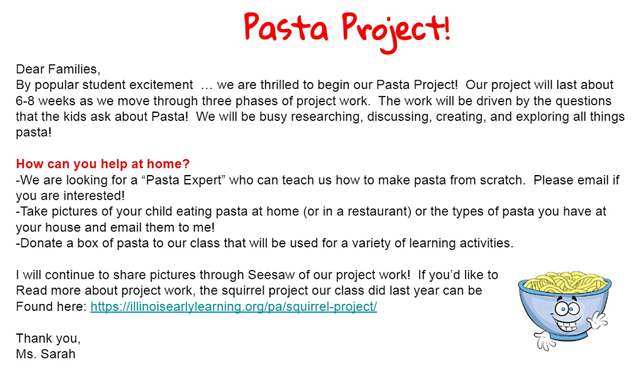
To start a project investigation, I like to get the parents involved right away by giving them opportunities and ways to support our project work from home. I shared a letter on our communication app that introduced the topic and shared ideas for them such as donating boxes of pasta to the classroom, sending me pictures of their child making or eating pasta at home or restaurants, and volunteering to be a pasta expert who would to come to the classroom. We received many pasta donations, which allowed us to set up hands-on activities. When parents sent me photos of their children eating pasta, I printed the photos so the students could tell their peers about what type of pasta they ate, what the toppings were, how it tasted, and if they helped cook it. My letter to parents (see Figure 3) also resulted in three volunteer pasta experts.
In the classroom, I focused on identifying and gathering books about pasta that would help us answer some of our questions. The students loved the stories and asked to have them read often. Some of our favorites included The Great Pasta Escape (2017), Oodles and Oodles of Noodley Noodles (2020), Strega Nona (2017), and More Spaghetti, I Say! (1977).
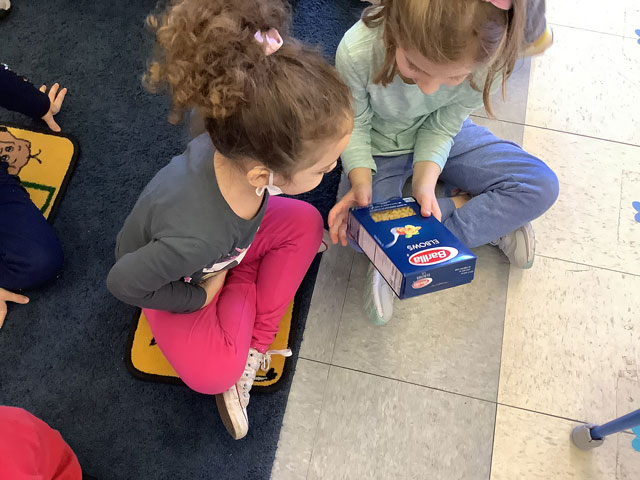
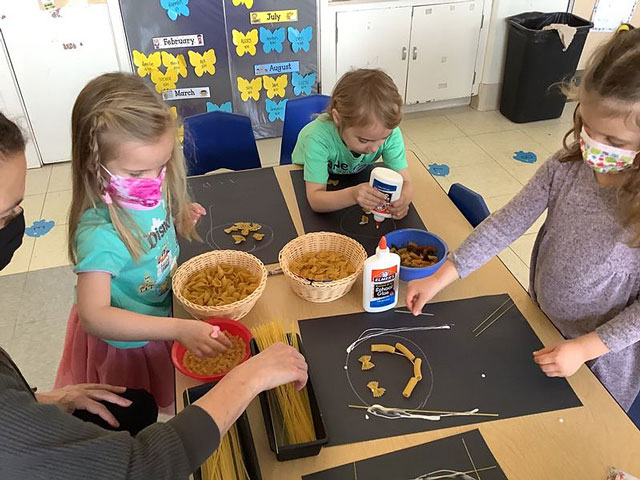
The SLP and I cotaught one of our first investigations. She brought a large bag that was full of several different types of pasta in boxes. We passed out a different type of pasta to partners of students, and they talked about what their pasta looked like, what they noticed about the box, and what type of pasta they thought it was. We helped each pair identify all the different types of pasta (see Figure 4).
Next, we read The Great Pasta Escape, which gave the students information about several different types of pasta. They commented about their favorite types of pasta. During center time, students made surveys to find out which types of pasta their friends like.
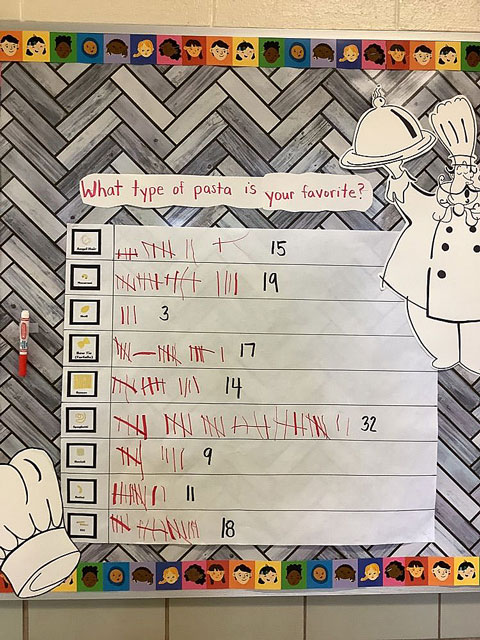
One day I wondered out loud whether other students at Madison school also liked pasta, and a student replied, “We can do a survey!” We decided to set up an interactive bulletin board in the form of a survey. I sent an email to the staff sharing information about our project and asked them to stop by our bulletin board with their class so they could add tally marks to indicate their favorite type of pasta. My class loved observing the bulletin board and always noticed when new tallies were added. We collected tallies for about two weeks, and then we counted them as a group (see Figure 5).
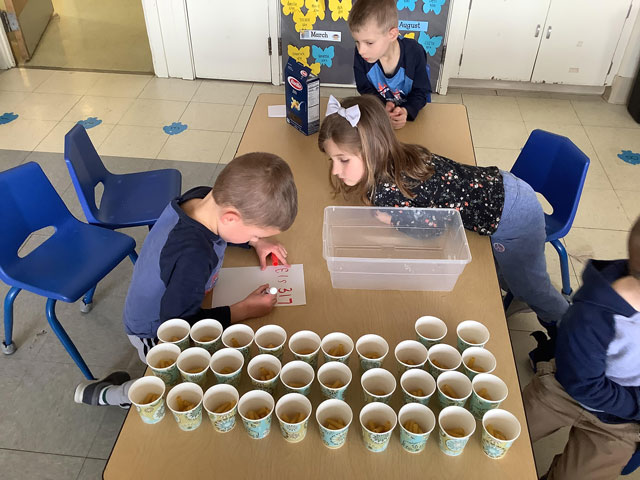
One of our original focus questions was, “How many pieces of pasta are in one box?” I created a chart paper with the question at the top and asked the students to write their names and predict an answer to the question (see Figure 6).
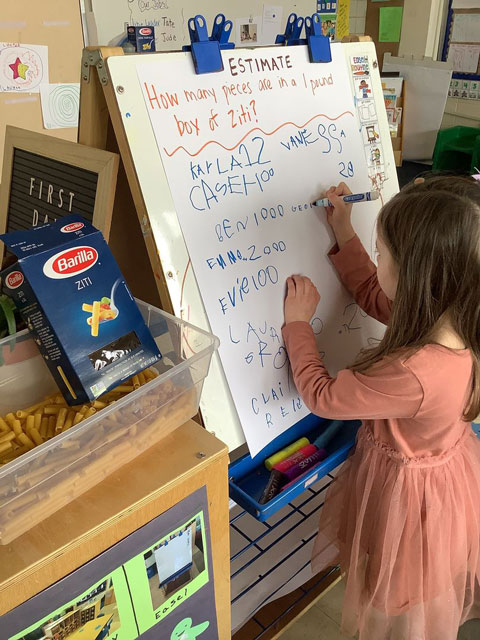
I then had a group of volunteers take all the pasta out of a one-pound box of ziti, and we counted it. I showed them how to organize the pasta into groups of 10 to help us skip count. The students were quickly able to pick up the concept that 10 groups of 10 equals 100, and they organized the cups into 10 rows of 10 (see Figure 7). The students counted 317 pieces of pasta in the box.
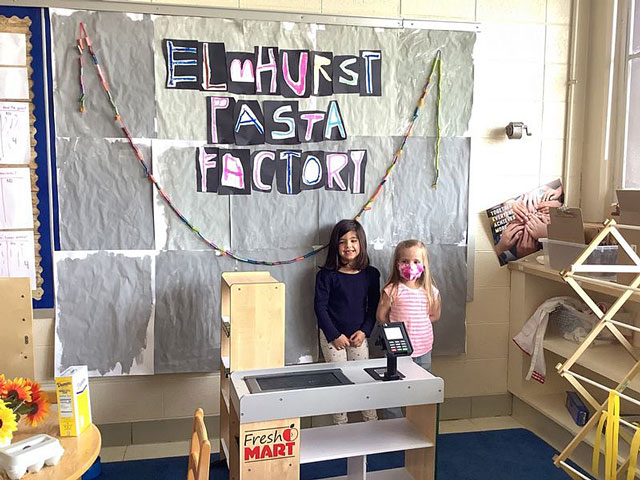
At circle time one day I asked the students, “What do you think we should turn our dramatic play center into for our Pasta Project?” I had chart paper ready, and they shared their ideas. They came up with three choices: Pasta Restaurant, Pasta Store, or Pasta Factory. Then they voted, and Pasta Factory won. They got the idea for this setting from The Great Pasta Escape.
Next, I asked the students to help me create a list of everything we needed to make our pasta factory. We looked through The Great Pasta Escape for ideas. Some students painted sheets of paper gray for the walls, while others made signs, organized pasta boxes, built an entrance out of PVC pipes, and identified ingredients needed to make pasta in the factory. We voted on a name for the pasta factory, and the winner was Elmhurst Pasta Factory. The students made a sign (see Figure 8). They also created additional signage and props for their factory (see Figure 9).
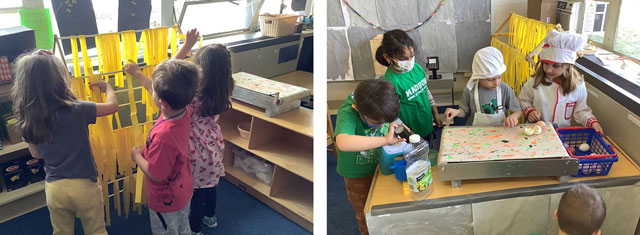
Meanwhile, I left pasta in the art center to see how students would use it to make open-ended art. Many students used the pasta as body parts to make faces. We gave the students large sheets of paper and asked them how they could use different types of pasta to make people. They instantly made the connection to The Great Pasta Escape where the pasta comes to life and were excited to make their own people from pasta (see Figure 10).
We prepared for a visit from our first guest experts. A parent and a grandmother offered to teach the students how to make ravioli. The grandmother is a trained chef with many years of experience. She joined us via Zoom, while her daughter (a student’s mother) came in person to demonstrate. The students created a list of questions:
- How do you get pasta in the shape you want it?
- What are the ingredients in the dough?
- Do you need eggs?
- How do you cook pasta? Do you use a microwave?
- What is your favorite kind of pasta?
- Do you make pasta for other people?
- Do you make flavored pasta? What ingredients?
- What makes pasta tasty?
- What country eats the most pasta?
- How long do you cook pasta?
- Who taught you how to cook?
During the demonstration, all the students were given the chance to help make pasta and eat it (see Figure 11). This experience helped them learn about the ingredients, one of the original focus questions. This demonstration carried over into dramatic play, where the students pretended to make ravioli and find the ingredients they needed.
The list of questions and the expert interview inspired the students to develop additional questions about pasta during Phase 2, such as “What ingredients can make pasta colorful?” and “Is rice a type of pasta?”
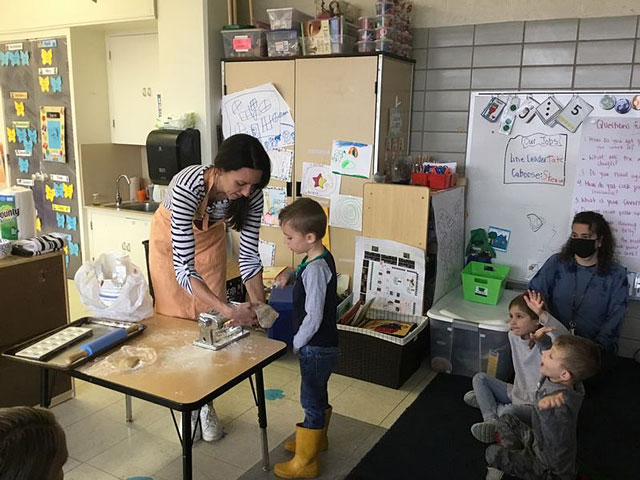
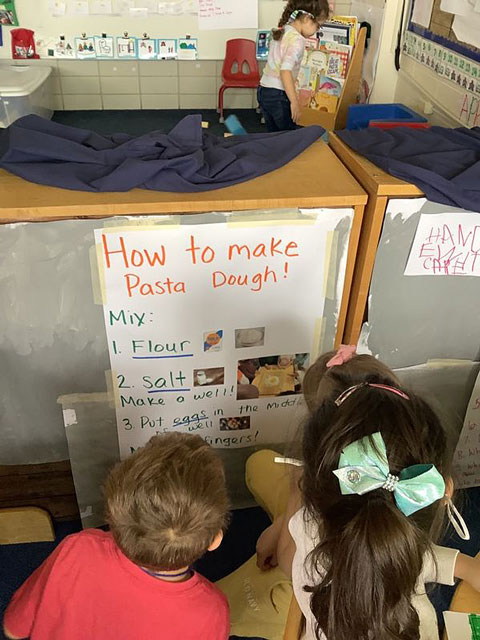
Another parent brought all the ingredients needed to make pasta dough. She taught the students the strategy of mixing all the dry ingredients together first (called a making a well) and then placing the egg inside to help with mixing. She also brought her tabletop pasta maker (called an extruder), and the kids turned the crank and saw the dough come out in the shape of spaghetti. We used the information we learned from her to make an anchor chart for dramatic play with the ingredients and steps to make pasta dough (see Figure 12).
These experts helped the students find answers to the original focus questions. The experts also helped the students answer additional questions that they wondered about through Phase 2, such as “Which tools do you use to make pasta?” and “How do you make pasta into different shapes?”
A student’s grandfather who worked in a food production facility that makes pasta helped us answer the question, “How does the pasta get to the store?” He took pictures and videos from inside the facility so the students could see the process that pasta goes through to be mass produced, packaged, and sent to stores. The video from inside the facility gave the students ideas for our pasta factory. After watching the video, one student said, “We need pipes like those long white ones,” and another said, “and lots of silver or gray color.” The guest expert also sent the class three different types of pasta made and packaged at the facility for the kids to take home to eat.
As Phase 2 was winding down, I drew the students’ attention to our focus questions and Question Catcher to discuss what we had learned already and to consider unanswered questions. We had not yet answered “How do you make pasta sauce?” I created a predictions chart and asked the students to predict what ingredients were in pasta sauce. I asked parents to send me family favorite pasta sauce recipes so we could compare how recipes for the same food can be similar and different.
Ms. Colleen, my classroom assistant, taught students to make one of her family’s favorite pasta sauces. She brought in all the ingredients, and the students added the ingredients to a large pot and stirred the sauce. Afterward, we made a chart listing the ingredients that are needed to make pasta sauce and displayed the chart in the Pasta Factory for kids to reference during play.
A student asked another interesting question during Phase 2. While playing with pasta in the sensory table, he asked, “Why is pasta tubular?” I added his question to the Question Catcher, and we did research via YouTube. I found a video that demonstrated how to make pasta into different shapes and the chef explained why pasta comes in different shapes. The students learned that some pasta is made in a tubular shape because the sauce gets trapped inside of it, which makes it tasty.
Phase 3: Concluding the Project
Referring back to our questions, the students realized that we had answered almost all of them. I asked, “WOW, are you guys actually becoming real pasta experts?” to which they eagerly replied “YES!”
I reminded the class that when we get close to finishing our research, it’s time to think of ways to share what we have learned with a culminating activity. I asked the class for ideas to end our Pasta Project in Phase 3. One student replied, “We want to eat more pasta!” and I added, “Should we have a pasta party?” The students cheered and agreed on a pasta party to culminate our project and share our learning.
I helped the students generate ideas about materials needed for our pasta party. They selected:
- Tablecloths
- Utensils
- Plates
- Silverware (forks and spoons)
- Pasta boxes
- Signs
- Placemats
- Streamers
- Pasta books
- Pretend pasta cake
- Our favorite music
- Pasta
- Games
- Yeti in My Spaghetti
- Meatball Mountain
- Ramen
- Pictures of pasta
It was important to the students that our favorite pasta books were part of the party. The students really fell in love with the stories, especially the characters. At the art center, we created “character placements.” The students chose their favorite characters from the stories and used copies of illustrations from the books to make placemats for the party.
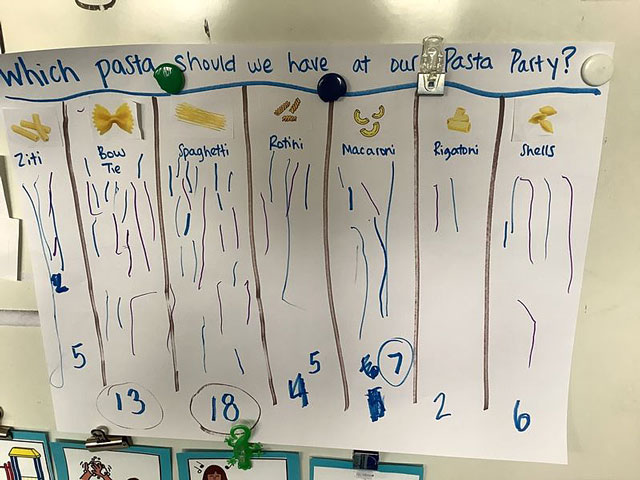
The students voted on types of pasta to serve at the party. The three types with the most votes were macaroni, bow tie, and spaghetti (see Figure 13).
They also decided that we needed decorations and a cake and worked together to make a sign, hang streamers, and create a pasta cake out of cardboard and boxes (see Figure 14).

The students were so excited about the party that we started a countdown so they knew when it was happening. When the day of the party arrived, there was a buzz in the air. The students were so happy and so proud! At the party they got to try three different pastas with different toppings: cheese, butter, and pasta sauce (see Figure 15).

The students sat in small groups and used their character placemats to talk about their favorite types of pasta.
One student told me he was eating pasta sauce for the first time and loved it!
We invited other teachers and staff members to stop by our party. That gave the children additional opportunities to share and celebrate their learning. At the end of the party, all the students took home their character placemats, and I presented each person with a certificate for officially being a Pasta Expert.
I shared photographs from the party with parents, and several said their child had learned so much and loved the creative project.
The children learned a lot about pasta from this project. They could name many different types, such as ziti, rigatoni, spaghetti, lasagna, ravioli, and ramen. They learned there are 350 types of pasta. They learned about different ways that pasta is cooked, such as boiled in water or cooked al forno (in the oven). They learned about different types of toppings. The students learned different tools for making pasta and how the shape of pasta helps it trap the sauce so it’s extra tasty. More importantly, over the course of this project I observed an increase in student engagement, persistence, curiosity, and teamwork.
Teacher Reflection
Reflecting on this project after using Project Approach for more than a decade in the classroom, I can honestly say this was the most engaged and excited I’ve ever seen a collective group of 31 students stay for an eight-week period. This project truly made me smile and feel inspired as a teacher because the students were so happy and motivated. It reminded me why the Project Approach is so important and necessary in early childhood classrooms. When student engagement and motivation are high, there is a direct impact on student growth in all areas, including social-emotional learning.
One of my intentions as a teacher going into this project was to be thoughtful and intentional in the language that I used to describe the different phases. Because my class already had experience with project work, I wanted to challenge them and myself. I made sure to use explicit project language such as webbing, tallying, and observational drawing as well as Phase 1, Phase 2, Phase 3, and culminating event. I was pleasantly surprised at how many students then used project language correctly in their conversations. For example, during the culminating activity a student said, “Oh yeah, I remember when we learned about that in Phase 2!”
I also thoroughly enjoyed working on this project with my PLC because they also implemented projects in their classrooms. The other classes did phenomenal projects on ice cream, pizza, and doughnuts. They displayed student work from their projects so that we could look at each other’s work throughout the building. I’m so proud to work with a staff that is willing to implement project work and sees the benefit it has on their students and our school community.