
Sarah Kuhlemeier
Regional Office of Education No. 8 Preschool Program
Stephenson and Jo Daviess counties
2017
The Pizza Project was completed in a mixed-age, blended Preschool for All classroom. The classroom was an inclusive classroom with a diverse group of learners, including children with disabilities, English language learners, and children identified as at-risk. Several children had language delays, including two children who were nonverbal. The classroom team included a teacher, full-time classroom aide, and two personal aides.
Phase 1: Beginning the Project
This project grew from the children’s conversation about a pizzeria opening in Freeport over the summer. A few of the children had visited there with their families and really enjoyed it. They were talking about their visits and pretending to make pizza with other plastic food items in the house area.
Phase 2: Developing the Project
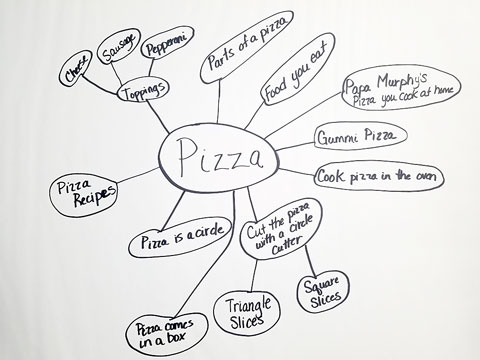
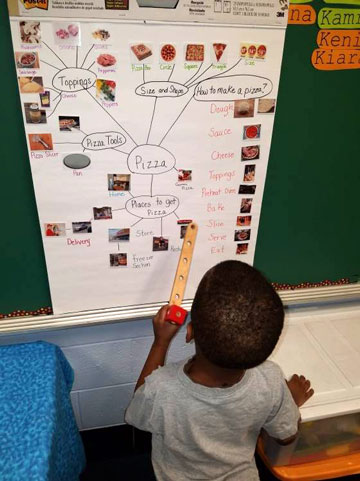
We started Phase 2 by having a whole group conversation about pizza and making a web about the things they knew and the things they wanted to know more about pizza. Although the children were interested in the web (see Figure 1), they were not able to really use it without any adult support. They would walk up to it and point and ask “What does this say?” The teachers decided to make photos match up with the words so they could use it more independently. It was much more kid friendly and usable once the pictures were on the web (see Figure 2). The pizza investigation lasted for three weeks. We referred back to the web often, and it was hung up in the classroom for the children to use.
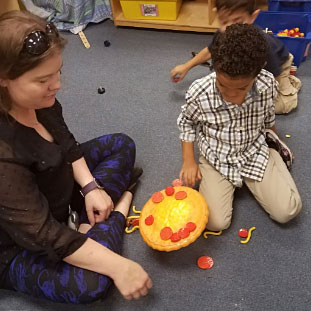
During our pizza study, we brought in several pizza-related items and tools and also added things to the learning areas so the children could pretend and display their learning. As the first week of investigation started, we added wooden and felt pizza toys as well as tools for the children to use. The children noticed the need for an oven during their play on the very first day with the toy pizza materials. The students took the pizzas to the dramatic play area to cook them, but they figured out that the play furniture in the classroom did not have an oven. They tried cooking them in the toy microwave, but the pizza was too big. The children were able to resolve that problem when they started working on building an oven (see Figure 3).
M., K., J., A., and B. worked on the oven. K. and J. spent nearly all of their work time for several days planning and working on the oven. J., who did much of the work, would study pictures and then replicate them in a drawing.
The process the children used to figure out how the oven door should work was interesting to watch. K. knew right away that the door was a square in the pictures, but “it had to open.” In the children’s first attempt, the oven door was too small to allow the pizza pan or pizza peel through it. M. thought it was best to just tip the peel to the side and fit it through, but K. was not okay with the pizza and toppings falling off the pizza while they cooked. She said, “We need to make the door bigger!”
The next dilemma was that because the first attempt at the oven door was too small, we had to cut a new one. But once we did, they figured out the door wasn’t in one piece then. It didn’t take M. and B. long to tape it to create one working door.
J. was a quiet but extremely observant participant. Her attention to detail was surprising. While most of the other students were focused on the door and figuring out how to “turn things,” J. was looking almost strictly at the stove top. All by herself, she went to grab a black marker and drew four burners on top of the oven (see Figure 4).
After they finished the oven, many of the students used it to cook in rather than the microwave in the dramatic play area.
As a small group, we also made playdough that was scented with Italian seasoning. It really did smell like pizza! Luckily, the children in this class did not eat it. We read a book that talked about the ingredients of pizza dough and the process of making it. After talking about pizza dough and the ingredients, a few students did make dough. A. and K. went and found some sticks from the tinker toys bin to use as a rolling pin. They were even writing and drawing in the flour! Some of the vocabulary from this conversation included soft, warm, and squishy and questions such as “When does the dough get to crust?”
One of the teachers talked about the toppings on pizza and told the children that some of them are grown in a garden (see Figure 5). She and the students inspected and planted the seeds of onions, tomatoes, basil, and oregano in a window box. The teacher hopes to grow them indoors over the colder months and observe the plants as they grow.
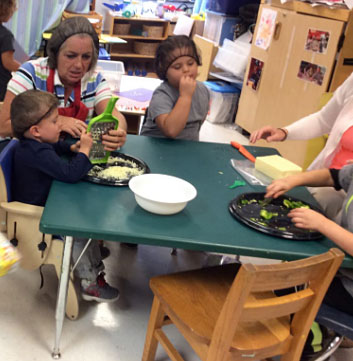
During Week 3, we taste tested sauce, cut and tasted green peppers, and grated cheese. Most of the students had never seen a block of cheese or a green pepper. They really enjoyed using the utensils and tasting their work. We talked about how the block of cheese starts out as a whole, but as they rub the cheese on the grater, it creates small pieces of cheese. In Figure 6, A. is sitting with his personal aide using the grater. A. has a hand that is nearly always in a fist. He was using his dominant hand to rub the cheese, and the weaker hand to hold the grater. It was great practice and work for his muscles.

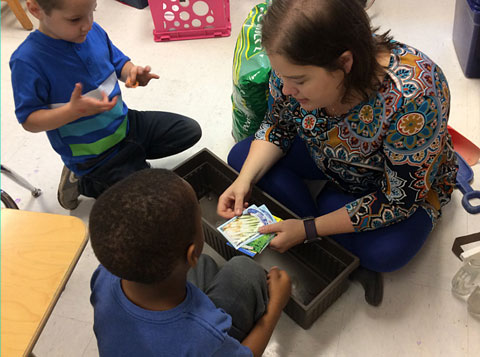
We taste tested three different brands of pizza sauce on Italian bread. Before we tried them, we spent some time looking at the jars and the appearance of the sauce in the container. D. predicted that the little specks in the sauce were pepper. We talked about the ingredients and what sauce was mostly made out of. After the children tasted all three, we asked the students to vote for their favorite one on a chart.
The teachers helped the children use a knife to cut a piece of green pepper to taste. There were only a few children in the class who were brave enough to taste the pepper. They thought that it would be spicy. When asked if she liked it, one child would always shake her head no, but she sat down and finished off the entire pepper. We had to take away the stem and seeds because she was trying to eat those, too!
At the end of Week 3, we talked about pizza ordering and delivery. We talked about why cooks wear hats or hairnets on their heads, and each child wore a hairnet while cooking for others. On the final day of Week 3, we cooked frozen pizza on a home appliance designed for heating a frozen pizza. As the children were sitting watching the pizza cook, we again reminded them that cutting and cooking were “grown up jobs” and that we want them to be safe. The children commented on the smell and the bubbles in the cheese as it cooked. They were mesmerized!
Phase 3: Concluding the Project
As a culminating event, we visited the new pizzeria that sparked the project. The manager, who was a parent of a preschooler at a neighboring school, was excited to show the children and parents the restaurant. He demonstrated how pizza was made and allowed each child to make their own personal pan pizza.